You log into QuickBooks. Your Shopify deposit shows up as $4,200. You click “Add” and let QuickBooks call it “Sales.” Done, right? Not quite.
At SAL Accounting, we see this with Shopify sellers constantly. The deposit looks simple on the surface, but it may include product sales, refunds, Shopify Payments fees, sales tax, shipping, discounts, and chargebacks, all rolled into one payout. So if you click “Add” and let QuickBooks record the whole deposit as income, your books may look clean, but the numbers won’t tell you what actually happened.
That’s the categorization gap.
This guide shows you how to categorize Shopify transactions properly using the right Shopify accounting categories, Shopify QuickBooks categorization, Shopify Xero categorization, A2X Shopify mapping, Synder, and a simple workflow to reconcile Shopify payouts.
Quick Takeaways
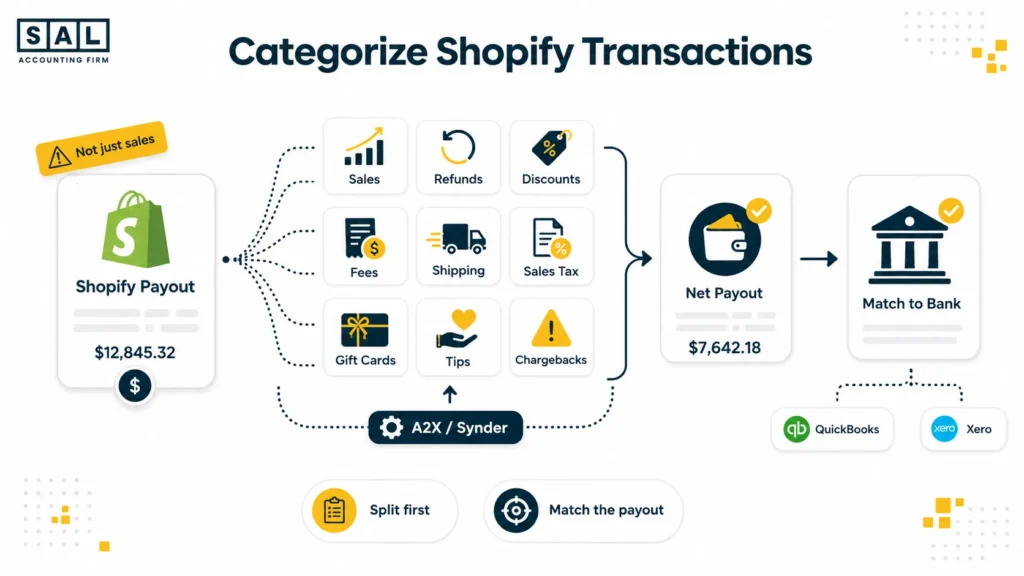
- A Shopify payout is not just sales. It can include refunds, fees, tax, shipping, discounts, gift cards, tips, and chargebacks.
- Set up your Shopify accounting categories before you start categorizing transactions.
- A2X and Synder can both help. A2X is better for larger stores, while Synder works well when you want more daily detail.
- US sales tax and Canadian GST/HST/QST should go into liability accounts, not income.
- Reconcile Shopify payouts every week so small issues don’t turn into a messy year-end cleanup.
- The Shopify Fee Calculator gives you a quick baseline on what Shopify Payments and transaction fees may be taken out of each payout.
How Do You Categorize Shopify Transactions?
To categorize Shopify transactions properly, don’t treat each Shopify payout as one big sales deposit.
Split it into the right categories: sales, refunds, discounts, Shopify Payments fees, shipping income, sales tax collected, gift cards, tips, and chargebacks. Then match the final payout amount to the actual bank deposit in QuickBooks or Xero.
Use A2X or Synder to automate the split. That’s the whole job. The rest of this guide walks through how that works.
If your Shopify books are already starting to feel messy, SAL can help with Shopify accounting so you can see what your store actually keeps after fees, refunds, tax, and product costs.
What Shopify Accounting Categories Should Be in Your Chart of Accounts?
Before you start categorizing Shopify transactions, your chart of accounts needs a place for each part of the payout to go. These are the Shopify accounting categories worth setting up first.
| Account | Type | What Goes Here |
| Shopify Sales / Product Revenue | Income | Gross sales, before fees or refunds |
| Shipping Income | Income | What customers paid for shipping |
| Gift Card Liability | Liability | Gift cards sold but not yet redeemed |
| Tips Payable | Liability | POS tips owed to staff |
| Refunds & Returns | Contra-revenue | Refunded sales |
| Discounts | Contra-revenue | Discount codes and sale prices |
| Shopify Payments Fees | Expense | Processing fees on Shopify Payments |
| Third-Party Gateway Fees | Expense | PayPal, Stripe, Shop Pay Installments fees |
| Sales Tax Payable / US | Liability | Tax collected from US buyers, by state |
| GST/HST Payable | Liability | Canadian federal sales tax collected |
| QST/PST Payable | Liability | Provincial sales tax for QC, BC, Sask., Man. |
| Chargebacks | Expense / contra-revenue | Funds clawed back by issuing bank |
| Cost of Goods Sold | Expense | Landed product cost on units sold |
| Shopify Payments Clearing | Asset / clearing | Holds the payout between Shopify and the bank |
Pro Tip: Set up the clearing account first. Every payout flows through it. Without one, you can’t tell whether the bank deposit actually matches the sales it settles. Our ecommerce payment reconciliation guide walks through clearing accounts step by step.
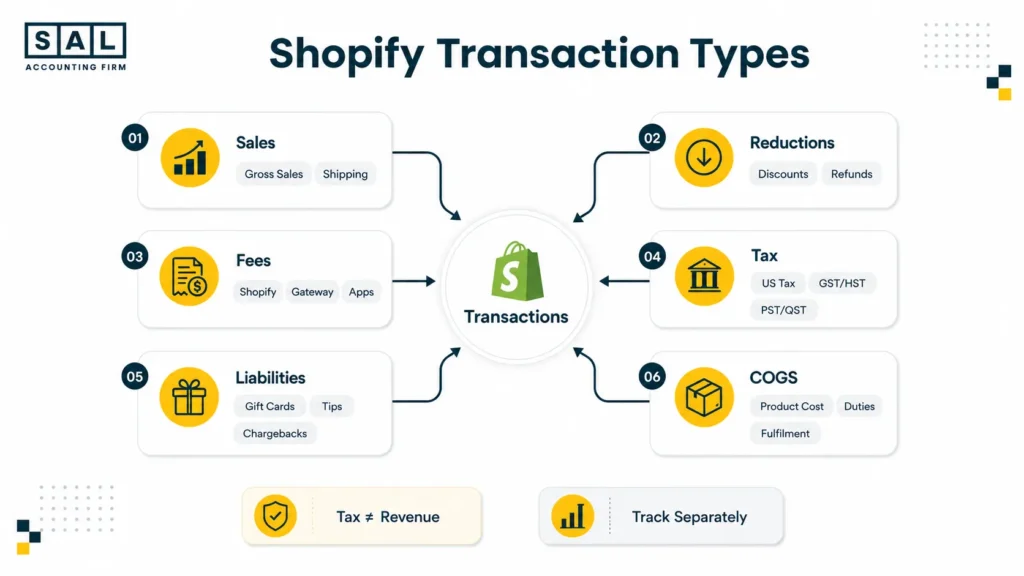
How Can You Categorize Every Shopify Transaction Type?
Now the part that trips most sellers up: what actually goes where, for each kind of transaction.
1. Gross Sales, Discounts, and Refunds
For Shopify refunds and discounts accounting, keep these separate:
- Gross sales → Shopify Sales or Product Revenue
- Discounts → Discounts
- Refunds → Refunds & Returns
If you net everything into one “Sales” line, you lose visibility into your refund rate, discount rate, and actual margin.
- Also read: “eCommerce Financial Statements Guide”
2. Shopify Fees and Payment Processing Fees
According to the Shopify Help Center, Shopify Payments charges between 2.4% and 2.9% + 30¢ per transaction, depending on your plan tier. These post to Shopify Payments Fees. PayPal, Stripe, and Shop Pay Installments have their own fee schedules, so post them to Third-Party Gateway Fees.
Your Shopify subscription, app fees, and Shopify Capital interest are different. Those are operating expenses, not payment processing fees.
If you’re unsure about plan costs, our Shopify pricing in Canada guide breaks down how the tiers affect your income.
3. Sales Tax: US States vs Canada
Shopify sales tax mapping matters because the sales tax you collect is not income. It’s money you may need to send to the government, so it belongs in a liability account.
Set it up like this:
- US sales tax: Use Sales Tax Payable / US, with separate state sub-accounts where you have nexus.
- Canada: GST/HST goes to GST/HST Payable. QST and PST go into their own provincial liability accounts.
The CRA’s GST/HST registration guidance covers the Canadian side, and our US economic nexus threshold checker helps you see where your US sales may have created filing requirements.
Pro Tip: If Shopify Tax or a marketplace facilitator like Amazon, Etsy, or Walmart collects and remits tax for you, still record it. Just mark it as collected by platform so you don’t treat it like tax you still owe. The Amazon Tax Exemption Program (ATEP) works differently and is worth understanding if you sell across channels.
4. Shipping Income and Shipping Costs
Shipping has two sides:
| What happened | Where it goes |
| Customer paid you for shipping | Shopify shipping income category |
| You paid Canada Post, UPS, USPS, or another carrier | Shipping Costs, COGS, or Freight Out |
This helps you see whether shipping is helping your margin, breaking even, or quietly costing you money. It also matters when you’re reviewing your ecommerce business expenses at month-end.
5. Gift Cards and Tips
A gift card sold isn’t revenue. It’s a promise. It goes to Gift Card Liability first, then moves to Shopify Sales when the customer redeems it. POS tips work the same way. They go to Tips Payable until they are paid out to staff.
6. Chargebacks
When a customer disputes a charge and wins, record the disputed amount in Chargebacks and any extra fee in Chargeback Fees.
That way, you can spot payment issues or fraud patterns without mixing them into regular returns. The Shopify refund policy has more on how disputes and returns flow differently through your books.
7. Cost of Goods Sold
COGS is the cost of the products you sold, including supplier cost, inbound freight, duties, prep, and fulfilment. Post COGS monthly, ideally by SKU. If you only update it once a year, your margin reports will be hard to trust for most of the year.
Our COGS guide for ecommerce stores covers the landed-cost math.
Which Tools Help You Categorize Shopify Transactions?
Now the practical part: how this looks in QuickBooks, Xero, A2X, and Synder.
Shopify QuickBooks Categorization
QuickBooks Online can connect with Shopify, but the native setup often brings in each order as a separate sales receipt. Once you have more than around 50 orders a month, that can make your books noisy fast.
The cleaner setup is to use A2X or Synder to send one summary journal per payout into QuickBooks, then match it to the bank deposit.
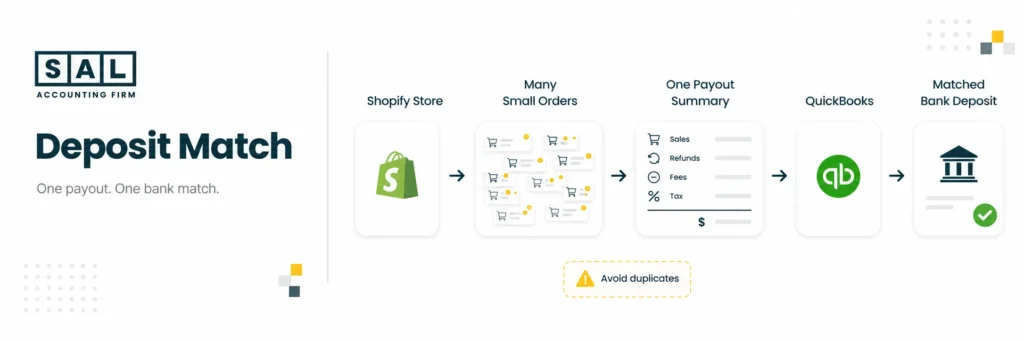
Pro Tip: turn off auto-categorize rules for Shopify deposits in your banking feed. Otherwise, you may record the same sales twice. This is one of the most common ecommerce accounting mistakes we see.
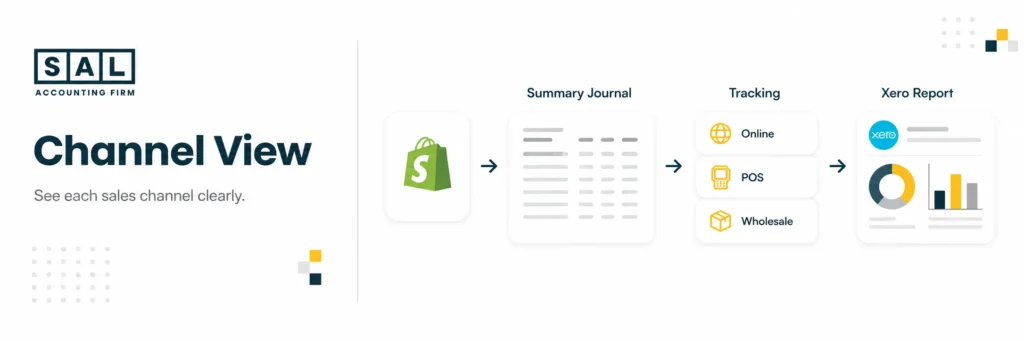
Shopify Xero Categorization
Xero works the same way in practice: A2X or Synder sends a clean summary journal into Xero, then you match it against the actual bank deposit.
Use Xero’s tracking categories to separate Shopify Online, Shopify POS, wholesale, or other revenue streams. The Shopify Xero integration guide covers the connection setup in more detail.
Shopify A2X Categorization
A2X Shopify mapping is built for clean payout summaries.
It pulls each Shopify payout, breaks it into the right pieces, applies your chart of accounts mapping, and posts one journal into QuickBooks or Xero. Set it up once, and you do not need to manually sort every fee, refund, tax line, or payout each month.
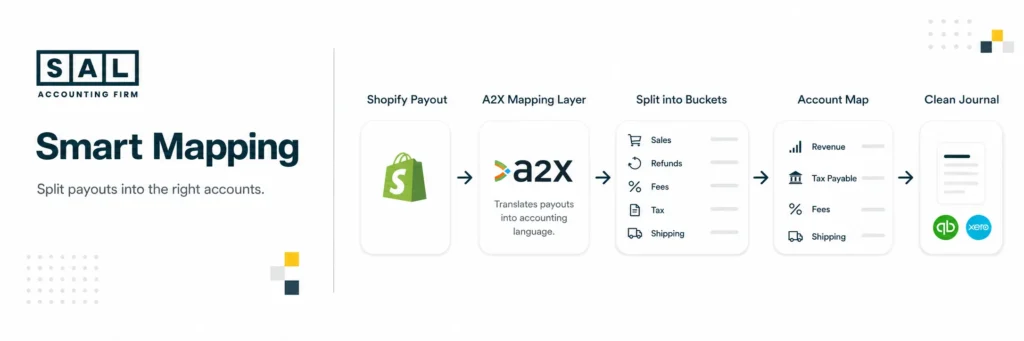
The A2X for Shopify integration guide covers the mapping setup step by step.
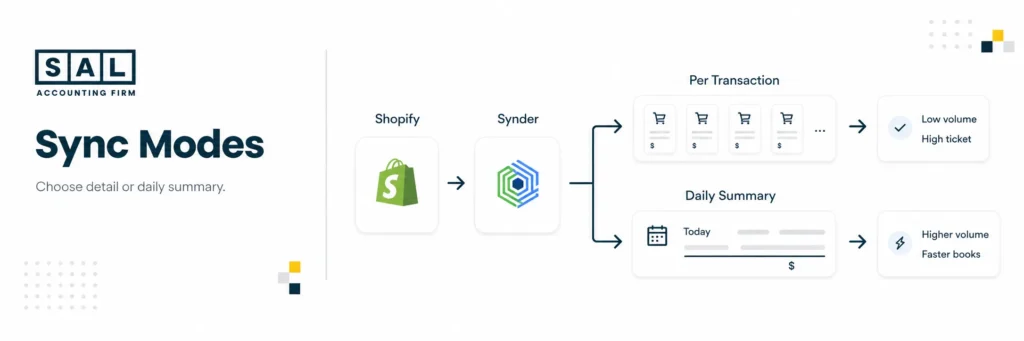
Shopify Synder Categorization
Synder gives you more flexibility in how Shopify data gets posted.
It runs in two modes:
- Per-transaction detail, where every order posts individually.
- Daily summary posting, where the day’s activity is grouped together.
Per-transaction suits low-volume, high-value stores, like custom furniture or jewellery. Daily summary suits high-volume stores where individual posting would flood the ledger.
Read more: “Best Accounting Software for Shopify Sellers”
Synder vs A2X for Shopify: Which One?
Both tools can help you categorize Shopify transactions, but they are built for slightly different workflows. Here’s the simple difference:
| Factor | A2X | Synder |
| Posting method | Summary journal per payout | Per-transaction or daily summary |
| Best for | $10K+/month, multi-channel | $0–$10K/month or detail-heavy stores |
| Multi-channel | Yes: Shopify, Amazon, Etsy, eBay, Walmart | Yes: Shopify, Amazon, Stripe, PayPal, Square |
| Sales tax handling | Strong; separates by jurisdiction | Strong; rules-based |
| Learning curve | Low after setup | Moderate, because more flexibility means more decisions |
| Pricing | Around $29–$249/month | Around $48–$275/month |
Both are good.
We default to A2X for clients doing more than $10K/month or running multiple sales channels, and Synder for smaller or more detail-focused setups. Neither one is a wrong answer.
How to Reconcile Shopify Payouts
The workflow that keeps the books clean:
- Pull the payout report from Shopify (Settings → Payments → Shopify Payments → Payouts).
- Let A2X or Synder post the summary journal to your clearing account in QuickBooks or Xero.
- Match the bank deposit to the journal — net amounts should tie to the penny.
- Investigate variances (common causes: missed chargebacks, gift card redemption mis-flagged, FX timing).
- Clear the clearing account to zero at month-end. If it’s not zero, something didn’t post.
Done weekly, it can take 15 minutes. Left until year-end, it can turn into hours of cleanup.
Pro Tip: Never close a month if your Shopify Payments clearing account isn’t at zero. A non-zero balance always means a payout, refund, or fee got missed.
Month-End Close Checklist for Shopify Sellers
Run this on the first business day of the new month:
- All Shopify payouts posted via A2X or Synder.
- Shopify Payments clearing account = $0.
- PayPal and Stripe clearing accounts = $0.
- Sales tax liability accounts reconciled against what was filed.
- Gift card liability matches Shopify’s outstanding gift card report.
- COGS posted for the month, by SKU.
- Bank reconciliation complete for every account.
- P&L pulled by sales channel.
Eight checks, 30–60 minutes once the setup is clean. Also our Shopify month-end close checklist has the full sequence if you want a structured process to follow each month.
Case Study: Vancouver Skincare Brand Cuts Month-End from 6 Hours to 45 Minutes1
Nadia runs a plant-based skincare brand on Shopify, doing about $40K/month with growing US orders.
Her books looked fine at first. But she still couldn’t clearly answer:
- How much profit did we actually make?
- How much did Shopify fees, refunds, and gift cards affect the numbers?
- Are we setting aside the right amount for US sales tax?
After Salman, CPA, and the SAL Accounting team reviewed the Shopify payout setup, the issue was clear: too much was being grouped into one “Sales” line.
Once the payouts were cleaned up, Nadia’s month-end process dropped from around 6 hours to 45 minutes. More importantly, she could finally trust the numbers before making pricing, inventory, and US expansion decisions.
¹ Hypothetical scenario. Numbers are illustrative.
How SAL Accounting Can Help
Categorizing Shopify transactions isn’t complicated. Doing it consistently (across every payout, every gateway, every tax jurisdiction, every month) is where most stores quietly fall behind.
We work with Canadian Shopify and Amazon sellers who are selling, or starting to sell, into the US. If your books feel “mostly right,” but you still can’t clearly see your profit, sales tax, or sales by channel, it may be time to clean up the setup. That way, you’re not carrying the same confusion into another quarter.
Book a free 30-minute call and we’ll review your Shopify setup, show you where the numbers may be getting mixed up, and explain what to fix next.
If you’re not sure whether you’re ready to book a call, start with the Shopify fee calculator. It can help you see how much fees may be affecting your numbers.
- Hypothetical Scenario ↩︎