If you’re tired of manually copying Shopify orders into Sage, this 2025 Shopify Sage Integration Guide is exactly what you need. We’ll show you how to connect Shopify with Sage in minutes and fully automate your accounting.
What surprises most store owners is that 73 % of e-commerce sellers without proper integration lose over $15,000 a year from stockouts, overstock, and data errors (Webgility 2025 Report). The biggest culprit? Taxes, fees, and multi-currency get scrambled between the two platforms, especially for U.S. and Canadian stores.
In today’s post from SAL Accounting, we’re giving you clear steps, the best tools, and fixes that save you hours every week.
Key Takeaways
- Proper Shopify Sage integration saves 15–30 hours of bookkeeping every month.
- A2X is the #1 choice for U.S. and Canadian stores in 2025 — perfect tax splitting and one-click payout reconciliation.
- Always turn on “Summarized settlements” and “Split taxes by region” — fixes 90 % of all errors instantly.
- Use a Shopify clearing account + COGS sync to make bank recs 60 seconds and gross profit real.
- Five-minute monthly spot-check + these settings = audit-ready books with zero ongoing effort.
Why Integrate Shopify with Sage in 2025 (And What Happens If You Don’t)
You’re already busy running your store. The last thing you need is another spreadsheet or late-night reconciliation session. Contact our dedicated Shopify tax accountant to automate your books today. A proper Shopify Sage integration removes all of that and gives you these real wins:
- You save 15–30 hours every single month on bookkeeping.
- Data errors drop to almost zero. More missed refunds, forgotten fees, or duplicate invoices.
- Inventory and cost of goods sold update in Sage automatically, so you never oversell or overstock.
- GST/HST, PST, QST, and U.S. state sales taxes post correctly every time. Income and sales taxes for Canadian and US Shopify sellers become hassle-free.
- Shopify payouts, Stripe, PayPal, and bank deposits match perfectly in Sage.
- Multi-currency transactions convert at the right rate with zero manual adjustments.
Example: Sarah runs a handmade jewelry store in Toronto. Before integration, she was overstocking silver by $2,100 every month because Sage never knew what actually sold on Shopify. One year after connecting the two, she freed up $25,000 in cash and finally took a real vacation.
Shopify Sage Integration Options: Which Method Should You Use?
You have three realistic ways to connect Shopify with Sage, including:
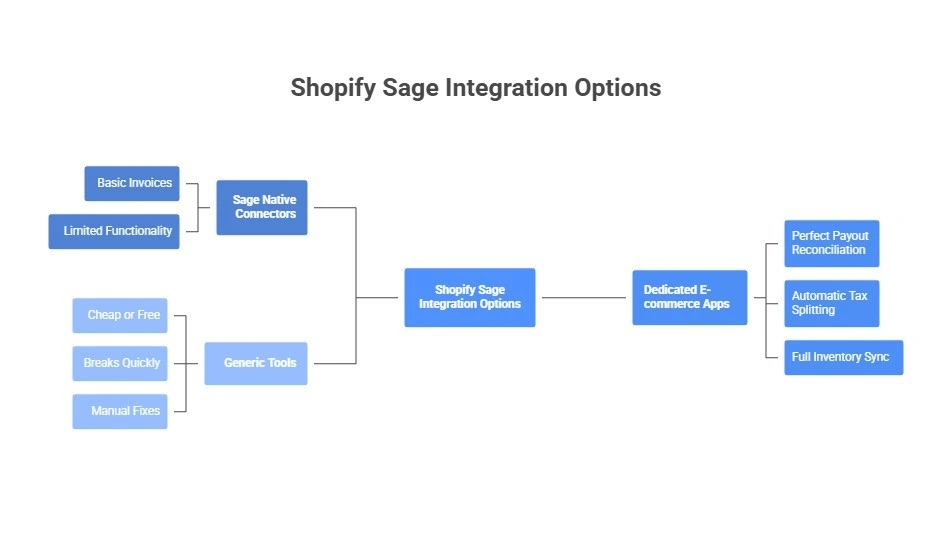
Sage Native Connectors
Built-in and low-cost. Works for tiny stores (<50 orders/month, GBP only). Creates basic invoices but does not split taxes by province or state, sync inventory or COGS, or reconcile payouts properly. Growing stores soon face messy books and manual fixes. See how to track COGS for your Shopify store.
Dedicated E-commerce Apps (the real solution for most stores)
These apps were built specifically for Shopify → Sage. The clear leader for U.S. and Canadian merchants is the A2X Shopify integration setup, because it delivers:
- Perfect one-click Shopify payout reconciliation
- Automatic tax splitting (GST/HST by province, U.S. sales tax by state)
- Full inventory and COGS sync
- Correct handling of refunds, partial refunds, discounts, gift cards, shipping, and fees
- Seamless support for Sage Business Cloud, Sage 50, and Sage Intacct
Parex (formerly Webgility) is excellent for high-volume or multi-channel sellers. Amaka works well for smaller stores that want simplicity and lower cost.
Pro Tip: Turn it on + fill “Cost per item” in every Shopify product. Your gross profit in Sage finally becomes real instead of zero.
Generic Tools (Zapier, Make.com, custom code)
Cheap or free to start, but they break quickly. They can’t handle refunds, discounts, Shopify fees, proper tax splitting, or payout reconciliation. You’ll end up fixing errors manually every week. Not suitable for any real store. These are among the best Shopify integrations for e-commerce.
Pro Tip: Do a three-minute monthly spot-check. First Monday of every month: open the latest payout, send to Sage, glance at the numbers. This will keep the month-end close process for your Shopify store away from issues.
Find the perfect Shopify Sage integration for your store in 10 seconds flat with the table below:
| Your Store | Recommended Tool | Price (2025) | Why It Wins | Avoid / Upgrade When |
| U.S. or Canadian store (any size) | A2X | $29–$149/mo | Perfect tax split, 1-click payouts, COGS | Never – stays perfect |
| Multi-currency store | A2X | $29–$149/mo | Exact bank match | Native/Zapier → rounding disasters |
| Multi-channel (Amazon, eBay, Etsy, etc.) | Parex (Webgility) | $99+/mo | Syncs all channels + inventory | Only if you sell on 3+ platforms |
| Tiny UK-only (<£100k/yr, GBP only) | Sage Native | Free | Good for <50 orders/month | Upgrade at multi-currency or 100+ orders |
| Testing / super small (any country) | Amaka (free tier) | Free → $29/mo | Free up to 50 orders, super simple | Move to A2X at 100+ orders or complex tax |
| High-volume / enterprise ($5M+) | A2X or Parex | $149+/mo | Continuous sync + priority support | Custom API rarely worth it |
Quick Recommendation
- U.S. or Canadian store: Go with A2X. It’s the most accurate, handles taxes perfectly, and saves the most time.
- Very small UK-only store: (single currency, low order volume) → The native Sage connector can work for now.
- Everyone else: (growing stores, multi-currency, multi-channel) → A2X is the clear choice.
Case Study: Jessica’s Ottawa Pet Store, From Chaos to Calm in 28 Minutes1
Problem right now: Jessica uses Sage’s free native connector. Every two-week $15,000 Shopify payout explodes into 400+ tiny lines in Sage. Taxes all dump into one account (no Ontario vs. Quebec split), inventory never updates, and she spends 20 hours a month fixing everything manually.
What we do: We switch her to a dedicated integration app, connect Shopify and Sage, map the accounts correctly, and turn on automatic tax splitting and summarized payouts – total time 28 minutes.
The result: Her current payout posts as one clean bank line. Taxes are split perfectly by province. Inventory finally matches reality. Jessica saves 20 hours a month and cuts $21,000 in excess stock in the first quarter.
Step-by-Step: How to Connect Shopify with Sage (2025 Setup)
You’ve picked the right integration app. Now let’s get it running perfectly in under 30 minutes. Just follow these steps exactly.
1. Create or log in to your integration account
Visit your chosen app (A2X, Parex, Amaka, etc.) and start the free trial (no credit card required). Select Shopify as your sales channel and Sage as your accounting software. Pick the best Shopify accounting software for your store.
2. Connect your Shopify store
Click the “Connect to Shopify” button. You’ll be taken to Shopify’s login screen. Then choose your store from the list, and click “Install” or “Approve”. The app only needs read access to orders and Shopify payouts. The whole thing finishes in 10–15 seconds.
3. Connect your Sage account
Choose your Sage version and follow the short prompts:
- Sage Business Cloud: Simply log in with your usual Sage credentials
- Sage 50: Download the free connector (here) and run it on the same computer where Sage 50 is installed
- Sage Intacct: Enter your Company ID and API credentials (your accountant can give you these). A green “Connected” checkmark appears when everything is ready.
They all can automate your Shopify accounting for a better sales experience.
4. Fetch your historical payouts (recommended)
Tell the app how far back to import, usually 60–90 days or since you started using Sage. It runs quietly in the background while you continue.
5. Map your Chart of Accounts (The most important step)
The app suggests a mapping that’s usually 95 % correct. Review and adjust these key lines:
- Shopify sales → your main Sales/Revenue account
- Shipping charged to customers → separate Shipping Income account
- GST/HST collected → GST/HST Payable (liability). Learn more about Shopify GST & HST for Canadian sellers.
- U.S. sales tax collected → Sales Tax Payable
- Shopify fees & payment processing → dedicated “Payment Processing Fees” expense
- Refunds & discounts → Returns & Allowances Click “Save Mapping” when finished.
Pro Tip: Create a temporary “Shopify Clearing” account in Sage and map every payout there first. Reconcile the bank once, then transfer. Eliminates 90% of reconciliation headaches.
Example: Imagine Alex sells a $79 hoodie + $14 shipping. If shipping lands in the Sales account, his gross margin looks like 82 % instead of the real 68 %. That one wrong mapping hid almost $38,000 in profit last year.
6. Set up automatic tax splitting
Go to Settings → Taxes → turn on “Split taxes by region”. The app will now create separate lines for every province (GST, HST, PST, QST) and every U.S. state automatically.
Pro Tip: Set notifications to “errors only”. Stops daily spam while still catching real problems.
7. Configure payout reconciliation
Settings → Payouts → select “Summarized settlements” (this is the setting most stores want). The app turns each Shopify payout into one clean bank deposit that matches your bank statement exactly. Check out the full Shopify payment reconciliation guide for more.
8. Choose your sync schedule
Pick what fits your store:
- Continuous sync (every few hours): Best for high-volume stores over $500k/year, so inventory and reports stay real-time
- Daily sync: More than enough for almost everyone else, and keeps things simple. Turn on “Automatic sync” and you’ll never have to press a button again.
Pro Tip: Set notifications to “errors only”. Stops daily spam while still catching real problems.
9. Run your first test sync
Pick the most recently completed payout, click “Send to Sage”, then open Sage and check that the invoice, tax lines, fees, and bank deposit all look perfect. From this moment forward, every sale, refund, fee, and tax posts itself. No more CSVs, no more late nights.
Pro Tip: Always run one test payout before turning on auto-sync. Send the most recent completed payout manually and open Sage to verify every line is perfect. Work with our experienced eCommerce tax accountant from SAL Accounting and eliminate manual work.

Advanced Shopify Sage Integration Settings That Save Hours
These five quick tweaks take less than three minutes but eliminate almost every remaining bookkeeping headache.
- Shopify Clearing Account: Create a temporary clearing/suspense account in Sage and map every payout there first. Reconcile once, then transfer to your real bank. Ends mystery deposits forever.
- Cost of Goods Sold (COGS) Sync: Turn on COGS in the app and add “Cost per item” to every product in Shopify. Your gross profit in Sage becomes accurate instead of zero.
- Automatic Tax Splitting by Region: Settings → Taxes → enable “Split taxes by region”. GST/HST, PST, QST, and U.S. state sales tax now post separate liability lines automatically. Check sales tax vs. use tax for Shopify stores to avoid mistakes.
- Summarized Payout Reconciliation: Settings → Payouts → choose “Summarized settlements”. Each Shopify payout becomes one clean bank deposit that matches your statement exactly.
- Discounts as Negative Income (Canada): Map discounts to post as negative income instead of reducing sales. Keeps GST/HST calculations correct and CRA-compliant.
Pro Tip: Turn on gift-card tracking (gift card setup in Sage). Sales hit a liability account; redemptions reduce it automatically, no manual journals.
- Read More: “Shopify Integration with QuickBooks: How to Sync, Automate & Reconcile Your Store’s Accounting”
| Setting | Where | Action | Result |
| Shopify Clearing Account | Sage → Chart of Accounts | Create clearing account → map payouts here | Bank rec = 60 seconds, zero mystery deposits |
| COGS Sync | App → Settings → COGS | Turn on + add “Cost per item” in Shopify | Real gross profit (not zero) |
| Tax Splitting by Region | App → Settings → Taxes | Enable “Split taxes by region” | Perfect GST/HST & U.S. state tax lines |
| Summarized Payouts | App → Settings → Payouts | Select “Summarized settlements” | One clean bank line per payout |
| Discounts as Negative Income (CA) | App → Mapping | Set discounts → negative income | CRA-compliant, no double GST/HST |
Case Study: Mark’s $31,000 CRA Nightmare That Disappears in One Afternoon*
Problem: Mark’s BC home-decor store has small daily mismatches – payouts off by $200–$900, taxes lumped together, refunds showing as negative sales. CRA just sent a $31,000 GST/HST reassessment plus penalties because nothing is split by province.
What we do: In one 45-minute call, we fix the five common issues: turn on summarized payouts, enable tax splitting by region, set up a clearing account, correct refund mapping, and enable COGS.
The result: Mark’s next payout posts perfectly. Bank reconciliation drops from two days to 60 seconds. CRA accepts the corrected filings and waives all penalties. The integration now runs on autopilot.
Common Shopify-to-Sage Integration Issues (and the Quick Fixes)
Here are the five problems we see most often—and how to solve them in under two minutes each:

1. Your payout amount doesn’t match the bank deposit
Fix: Settings → Payouts → switch to “Summarized settlements” and map Shopify fees to an expense account (not sales). Everything lines up perfectly.
2. Taxes aren’t split by province or state
Fix: Settings → Taxes → turn on “Split taxes by region”. Re-sync one payout and you’ll instantly see separate GST, HST, PST, QST, and U.S. state lines.
3. You’re getting duplicate invoices or orders.
Fix: In the Payouts/Settlements tab, mark the overlapping date range as “Already imported” or exclude it.
4. Inventory or COGS aren’t updating in Sage.
Fix: Settings → Cost of Goods Sold → enable it, then add “Cost per item” to every product in Shopify. You can handle inventory accounting in Shopify with no headache.
5. Refunds appear as negative sales instead of proper returns
Fix: Chart of Accounts → map Refunds to your Returns & Allowances account (not Sales). Re-sync one refund to test.
Pro Tip: For Shopify multi-currency stores, choose “settled currency” (or “payout currency”) in settings. Bank deposits match to the penny. Get professional bookkeeping for eCommerce stores with SAL Accounting and save 15–30 hours every month.
Final Thoughts
A correct Shopify-to-Sage integration in 2025 removes manual work, saves 15–30 hours each month, splits taxes accurately by region, reconciles payouts in one click, and delivers real inventory and gross profit figures. Your books become automated, accurate, and audit-ready overnight.
Contact SAL Accounting today. We configure everything perfectly in under an hour so you gain clean financials and full confidence to grow your business.
- Hypothetical scenario ↩︎
FAQ: Shopify & Sage Integration
Choose A2X or Parex, connect Shopify and Sage, map accounts, enable summarized settlements and tax splitting, then turn on automatic sync. Done in under 30 minutes.
Sage excels at complex taxes, multi-currency, inventory, COGS, and full audit compliance for CRA and IRS.
Yes. A2X and Parex convert transactions at Shopify’s exact rates and post payouts in your bank currency with perfect matching.
Yes. Enable “Split taxes by region” and every province and U.S. state tax posts to its own liability account automatically.
Turn on COGS sync in the app and enter “Cost per item” in Shopify products. Stock levels and COGS update in Sage with every sale and refund.
Payouts not matching banks (fix: summarized settlements), taxes lumped together (fix: split by region), inventory not updating (fix: enable COGS sync), mystery deposits (fix: use clearing account).
Daily automatic sync is ideal for most stores. High-volume stores can use continuous sync
All data posts as clean entries. Open Sage and run Profit & Loss, Balance Sheet, or tax reports — everything is accurate and current.