A Shopify payout can look simple when it lands in your bank: one deposit, one number. But once Shopify connects to QuickBooks Online, that payout needs to be broken down properly. Sales, refunds, fees, gift cards, GST/HST, U.S. sales tax, and timing differences all need to land in the right place. That’s why many sellers see Shopify, QuickBooks, and the bank showing different numbers.
At SAL Accounting, we see this often with stores trying to automate their books. This guide will help you understand what to set up, what to watch for, and how to get Shopify and QuickBooks working together so payouts are easier to match, reports are cleaner, and month-end feels less messy.
Before you start, try the Shopify Fee Calculator to get a clearer idea of how fees may be affecting what your store actually keeps.
Quick Takeaways
- Shopify can connect to QuickBooks Online through apps like Shopify Connector by QuickBooks, A2X, Webgility, MyWorks, and Link My Books.
- A2X is often best for clean payout reconciliation.
- Shopify Connector can work well if you want order-level detail inside QuickBooks.
- Sales, refunds, discounts, fees, gift cards, GST/HST, and U.S. sales tax should not all land in one account.
- Reconciliation works best when each Shopify payout matches one QuickBooks entry and one bank deposit.
- Canadian sellers need clean GST/HST mapping.
- U.S. sellers need sales tax separated from income.
If your Shopify numbers are already getting harder to trust, SAL can help with e-commerce bookkeeping so your reports reflect what actually happened in the store.
What Is Shopify QuickBooks Integration?
Shopify QuickBooks integration connects your Shopify store to QuickBooks Online. Basically, it lets Shopify data move into QuickBooks without manually entering every order, refund, fee, tax amount, or payout. Depending on the app you use, Shopify data can sync in two main ways:
Order-level sync: each order appears in QuickBooks. Payout-summary sync: each Shopify payout is summarized into one cleaner entry. A good integration helps QuickBooks show the full story behind each payout, including:
- sales
- refunds
- discounts
- shipping
- Shopify fees
- payment processor fees
- gift cards
- GST/HST or U.S. sales tax
- net deposits
- clearing account balances
The point isn’t just to connect two apps. The point is to make QuickBooks reflect what actually happened in your Shopify store. This often connects to e-commerce payment reconciliation, because the issue is not just the sale. It’s what happened between the platform, processor, and bank.
Does Shopify Integrate With QuickBooks Online?
Yes, Shopify integrates with QuickBooks Online. You can connect the two using apps like Shopify Connector by QuickBooks, A2X, Webgility, MyWorks, Link My Books, and other ecommerce accounting tools. The basic flow is usually to connect Shopify, connect QuickBooks, choose your sync settings, and test the first data transfer through the QuickBooks setup flow.
The right app depends on what you want QuickBooks to show. Some Shopify sellers want every order imported. Others want clean payout summaries that are easier to reconcile.
Both setups can work. The better choice depends on your order volume, payment gateways, tax setup, and how much detail you want inside QuickBooks. This is also where ecommerce accounting software choices matter, because the tool you pick affects how clean your books look later.
Manual Shopify Bookkeeping vs Automation: When Is QuickBooks Integration Worth It?
Manual entry can work when your Shopify store is very small. But once you have regular orders, refunds, fees, taxes, gift cards, and multiple payment gateways, it gets messy fast. Let’s say Shopify deposits $8,700 into your bank. That one deposit might include:
- $10,000 in gross sales
- $300 in refunds
- $450 in tax collected
- $250 in shipping collected
- $200 in processing fees
- discounts and other adjustments
If you record only the $8,700 bank deposit as sales, your books may look simple, but they’re not showing the full picture. Automation helps when you want:
- less manual entry
- faster month-end reconciliation
- cleaner fee tracking
- better GST/HST or sales tax reporting
- reports you can actually trust
Automation is worth it when Shopify activity becomes too detailed to track properly by hand. This is the same reason many sellers start looking at automated Shopify accounting once payouts, refunds, tax, and app fees start taking too much time to sort manually.
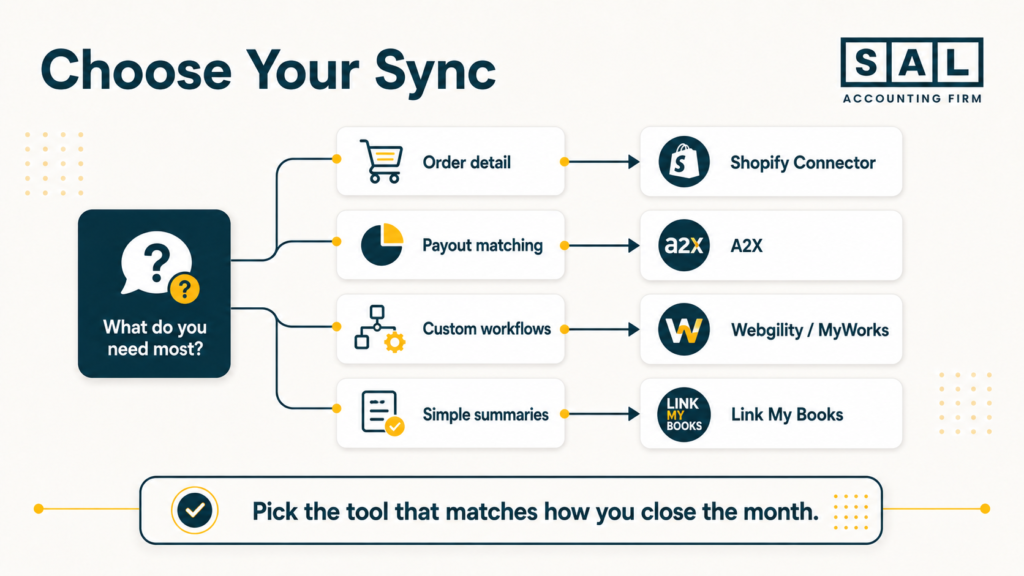
Best Shopify QuickBooks Integration Apps: A2X vs QuickBooks Connector
Before connecting Shopify to QuickBooks, choose the tool that fits how you want your books to work. Some apps send every order into QuickBooks. Others summarize sales activity by payout. Neither option is automatically better. It depends on what your store needs.
Shopify Connector by QuickBooks
Shopify Connector by QuickBooks can work well if you want order-level detail inside QuickBooks. It can help bring Shopify transactions and related data into QuickBooks Online through the connector setup. Choose this if:
- you want individual orders inside QuickBooks
- your store has lower transaction volume
- you want more detail in QuickBooks reports
- you don’t mind more entries to review
What to expect: You get more detail, but more detail can also create more cleanup. If your store has many daily orders, QuickBooks can start feeling crowded.
A2X
A2X is often a strong fit for Shopify sellers who care most about clean reconciliation. Instead of pushing every order into QuickBooks, A2X summarizes Shopify sales, fees, taxes, refunds, gift cards, and other transactions into payout summaries that are built to reconcile with deposits (A2X Shopify app). Choose this if:
- you want cleaner books
- you want faster reconciliation
- your Shopify volume is growing
- you don’t need every order inside QuickBooks
- you want better payout matching
What to expect: A2X gives you less order-level detail inside QuickBooks, but it usually makes month-end much easier. You can still keep order details in Shopify while QuickBooks holds clean accounting summaries.
For a deeper look at this workflow, A2X for Shopify integration is useful when you want to understand why payout summaries can be cleaner than order-level syncing.
Other Shopify QuickBooks Integration Tools
A2X and Shopify Connector are common, but they’re not the only options. Other tools may fit better depending on your setup:
- Webgility: useful for complex or multi-channel sellers
- MyWorks: helpful if you want more posting control
- Link My Books: useful for summaries and tax breakdowns
This can also connect to the best Shopify integrations for ecommerce stores, especially if you’re comparing accounting, inventory, CRM, and automation tools together. Here’s a simple comparison:
| Tool | Best For | Sync Style | Main Use |
| Shopify Connector | Order detail | Order-level | Syncs individual orders |
| A2X | Clean reconciliation | Payout summary | Matches payouts faster |
| Webgility | Complex stores | Custom workflows | Handles multi-channel sales |
| MyWorks | Custom control | Order-level/custom | Adjusts posting rules |
| Link My Books | Simple summaries | Summary-based | Supports tax breakdowns |
Simple takeaway: if payout matching is your biggest issue, look at A2X first. If you need every order inside QuickBooks, Shopify Connector may fit better.
- Also read: “Best Accounting Software for Shopify Sellers”
How to Connect Shopify to QuickBooks Online Step by Step
Once you choose your tool, the setup needs to be done carefully. The app may connect quickly, but mapping decides whether your reports make sense.
1. Prepare QuickBooks Online
Before connecting Shopify, set up the main accounts you need in QuickBooks. You may need accounts for:
- Shopify sales
- shipping income
- discounts
- refunds
- Shopify fees
- payment processor fees
- gift cards
- GST/HST payable
- U.S. sales tax payable
- Shopify Payments clearing
- PayPal clearing
- other gateway clearing accounts
For Canadian sellers, GST/HST should be set up before relying on the sync. For U.S. sellers, sales tax should be reviewed so collected tax doesn’t get treated like income. This is where Shopify accounting can help if the setup already feels messy. The goal is not just to connect the app. It’s to make sure your reports show sales, fees, refunds, taxes, and payouts clearly.
2. Connect Shopify and QuickBooks
Next, connect Shopify through your chosen app. Usually, this means:
- Sign in to Shopify.
- Give the app access to your store.
- Sign in to QuickBooks Online.
- Give the app permission to post data.
- Choose order-level or payout-summary sync.
- Select your payment gateways.
- Review currency settings if needed.
Take your time here. A rushed setup can create cleanup later.
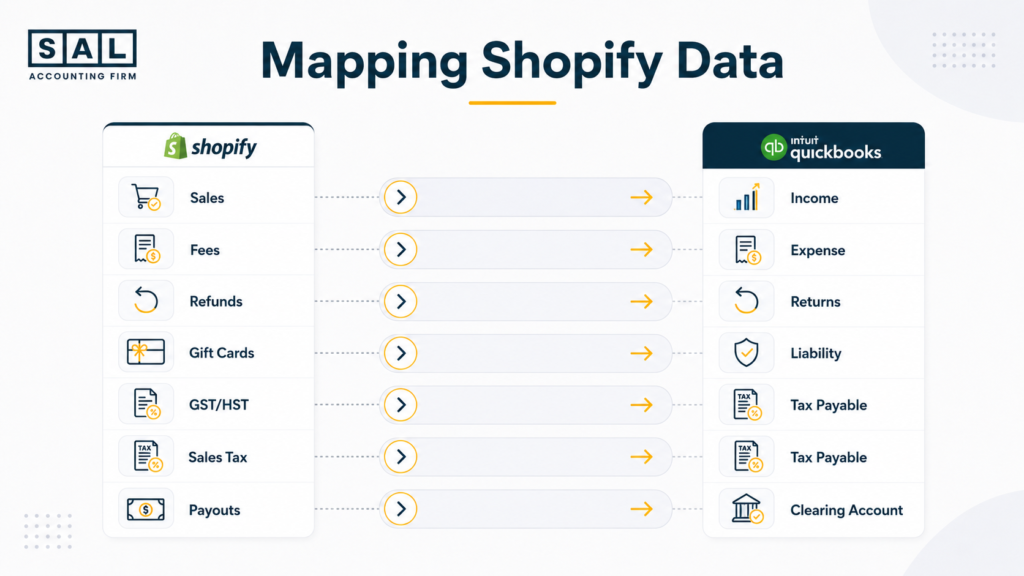
3. Map Shopify Accounts and Taxes
Mapping tells the app where Shopify activity should go in QuickBooks. For example:
- Sales go to income.
- Shopify fees go to expenses.
- Gift cards usually go to a liability account.
- GST/HST or sales tax goes to tax payable.
- Payouts move through a clearing account.
This matters because collected tax isn’t revenue. Fees shouldn’t disappear inside sales. Refunds shouldn’t be hidden.
4. Run a Test Sync
Don’t sync years of Shopify data right away. Start with a short date range, such as 7 to 14 days. Then check:
- Do sales land in the right account?
- Are refunds separate?
- Are fees recorded as expenses?
- Is GST/HST or sales tax mapped correctly?
- Does the payout match the bank deposit?
- Does the clearing account return to zero?
If something looks wrong, fix it before turning on auto-sync.
5. Turn On Auto-Sync
Once the test looks right, turn on auto-sync. Daily syncing works well for many stores because problems are easier to catch early. This also fits naturally into a Shopify month-end close checklist, because the best time to catch errors is before they pile up.
Pro Tip: Reconcile weekly or bi-weekly instead of waiting until month-end. One payout mismatch is easier to fix than a full month of them.
How to Map Shopify Sales, Fees, Refunds, and Taxes in QuickBooks
A clean Chart of Accounts makes Shopify accounting much easier. Your Chart of Accounts is where QuickBooks organizes your money. If Shopify data lands in the wrong place, your reports may look fine at first glance but still be wrong underneath. Here’s what that can look like in practice:
| Shopify Data | QuickBooks Account | Why It Matters | Common Mistake |
| Sales | Income | Shows revenue | Recording only deposits |
| Shipping | Shipping income | Separates shipping | Mixing with sales |
| Discounts | Contra-income | Shows reductions | Ignoring discounts |
| Refunds | Returns/refunds | Tracks returns | Hiding in sales |
| Shopify fees | Expense | Shows platform costs | Netting against income |
| Payment fees | Merchant fees | Tracks processor costs | Mixing all fees |
| Gift cards | Liability | Tracks unredeemed value | Recording income too early |
| GST/HST | Tax payable | Separates Canadian tax | Treating tax as sales |
| U.S. sales tax | Sales tax payable | Separates collected tax | Posting tax to income |
| Payouts | Clearing account | Helps deposits match | Skipping clearing accounts |
Pro Tip: Default accounts aren’t always enough for ecommerce. You may want separate accounts for Shopify Payments, PayPal, shipping, discounts, refunds, and different sales channels.
This is where Shopify accounting best practices matter. Your setup should make it easier to see sales, fees, refunds, tax, inventory, and profit without digging through messy entries.
For stores carrying product inventory, the same issue connects to Shopify inventory accounting, because revenue only tells part of the story. You also need to know what each sale actually costs.
- Also read: “Shopify Accounting Best Practices”
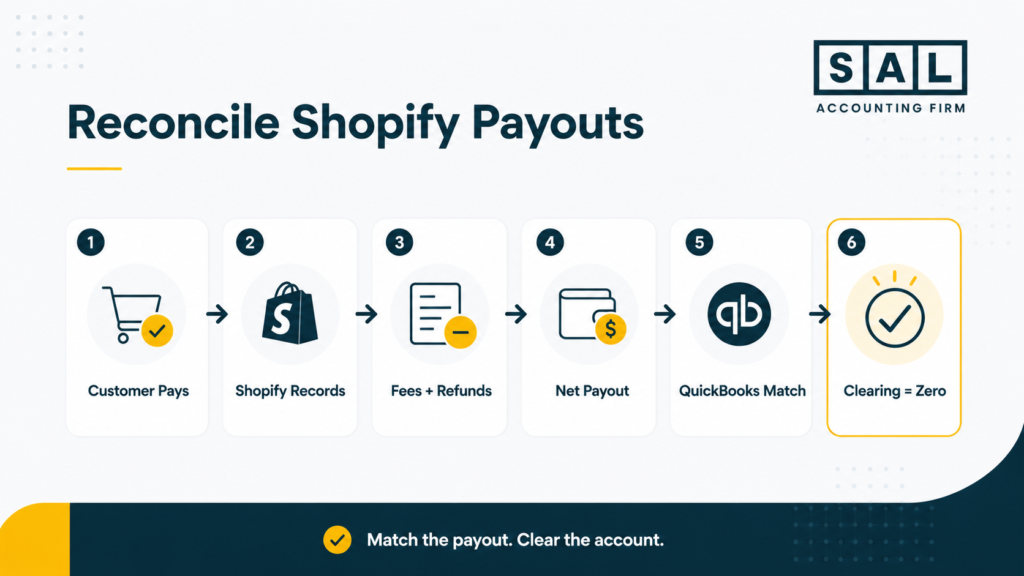
How to Reconcile Shopify Payments in QuickBooks Online
Reconciliation means matching what Shopify says happened to what actually hit your bank. This is where many Shopify sellers get stuck. Shopify doesn’t deposit every sale one by one. It groups payments, subtracts fees, adjusts for refunds, and sends a net payout.
When the numbers don’t line up, start with the Shopify payout details and compare them against the QuickBooks entry and bank deposit.
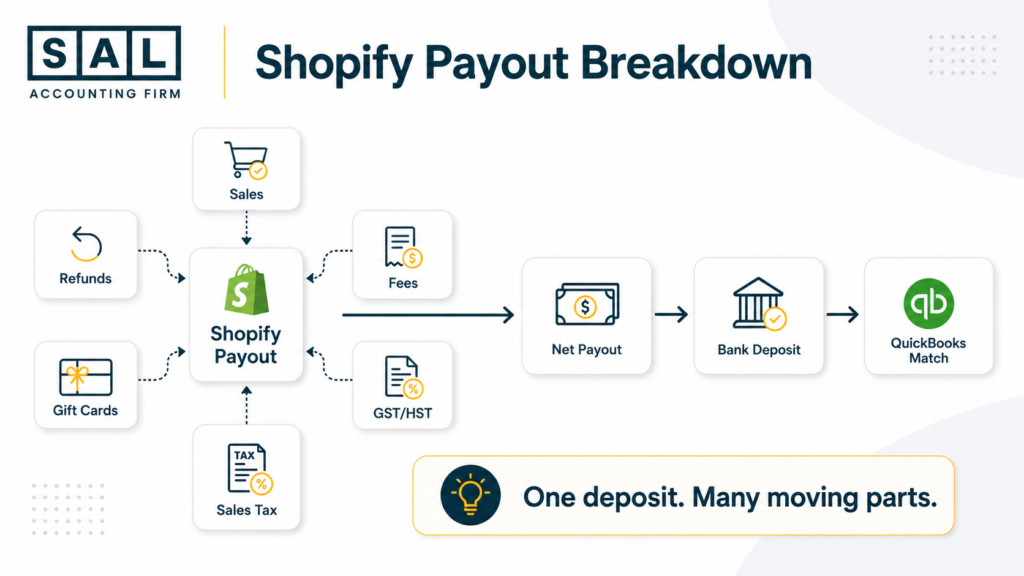
Understand the Shopify Payout Flow
Here’s the simple version:
- Customers pay through Shopify.
- Shopify records the sale.
- Fees, refunds, taxes, and adjustments are applied.
- Shopify sends a net payout to your bank.
- QuickBooks needs to match that net payout.
Refunds can also affect later payouts because Shopify Payments refunds may be deducted from the next available payout (refund timing).
Match the Payout to the Bank Deposit
In QuickBooks, compare the Shopify payout summary to the bank deposit. If they match, you can match the transaction. If they don’t match, check for:
- missing fees
- refunds
- chargebacks
- timing differences
- currency differences
- mixed payment gateways
- tax mapping issues
Most mismatches are fixable once you know where to look. This is why Shopify payment reconciliation deserves its own process. It’s not just a bank feed task. It’s how you confirm that sales, deductions, tax, and deposits all line up.
Use Clearing Accounts for Payment Gateways
If you use Shopify Payments, PayPal, Klarna, Shop Pay, or other gateways, keep them separate. Each processor should usually have its own clearing account.
That way, Shopify Payments clears against Shopify Payments deposits. PayPal clears against PayPal deposits. Klarna clears against Klarna deposits. This keeps reconciliation much cleaner.
Clear the Shopify Payments Clearing Account
A clearing account is a temporary holding place.Money goes into the clearing account when Shopify activity is recorded. It comes out when the payout hits your bank.
After reconciliation, the clearing account should usually return to zero. If it doesn’t, that’s a sign something needs to be reviewed.
- Also read: “Shopify Payment Reconciliation Guide”
Case Study: Fixing Shopify Payout Mismatches for a Toronto Bakery1
A Toronto Shopify bakery is making steady online sales, but QuickBooks doesn’t match Shopify.
The Problem
Bella’s Bakery has about $12,000 in monthly Shopify sales. Shopify Payments and PayPal payouts are mixed together in QuickBooks. Refunds and fees also aren’t showing clearly, so every month the owner spends hours trying to figure out why the bank deposits don’t match the Shopify reports.
What We Do
We clean up the setup by creating separate clearing accounts, reviewing refund and fee mapping, checking GST/HST mapping, and setting up weekly reconciliation.
The Result
The payouts start matching QuickBooks properly. Month-end reconciliation drops from about 5 hours to 30 minutes, and the owner can finally see sales, refunds, fees, and deposits more clearly.
Why Shopify Payouts Don’t Match QuickBooks
Shopify payouts usually don’t match QuickBooks because the full payout activity hasn’t been recorded correctly. Common reasons include:
- fees are missing
- refunds are posted to the wrong place
- GST/HST or sales tax is mapped incorrectly
- PayPal or Klarna payouts are mixed with Shopify Payments
- the payout date and bank deposit date are different
- currency conversion creates a difference
- manual edits changed the QuickBooks entry
This is common. It doesn’t mean your whole setup is broken. Start with the payout report, then compare it to the QuickBooks entry and the bank deposit. The goal is simple: the payout summary, clearing account, and bank deposit should all make sense together.
This is also one of the most common ecommerce accounting mistakes: recording what hits the bank without explaining what happened before the deposit arrived.
Shopify QuickBooks Integration for GST/HST and U.S. Sales Tax
Tax mapping matters because collected tax is not your revenue. For Canadian sellers, GST/HST should stay separate from sales. For U.S. sellers, sales tax should also stay out of income, especially if your U.S. sales are growing. If that side feels unclear, U.S. sales tax requirements for Canadian sellers is the better next step.
Before tax time, the GST/HST Refund Calculator for eCommerce Stores can help Canadian Shopify sellers get a clearer starting point.
For Canadian Shopify Sellers
Canadian sellers should check:
- GST/HST registration setup
- tax rates in Shopify
- tax mapping in QuickBooks
- tax-exempt products or customers
- provincial sales tax rules where relevant
For rate checks, use the current provincial or territorial GST/HST rates. This is where Shopify GST/HST tax rules become important. The sync can move the data, but the tax setup still needs to be right.
For U.S. Shopify Sellers
U.S. sellers should check:
- sales tax settings in Shopify
- state-by-state tax setup
- nexus-related collection requirements
- tax mapping in QuickBooks
- whether sales tax is separated from income
If QuickBooks is part of your sales tax workflow, automated sales tax settings may also need a quick review (QuickBooks sales tax).
For cross-border stores, this can get even more confusing. Selling internationally on Shopify adds more layers because taxes, currency, shipping, and reporting all start interacting.
Pro Tip: Don’t rely on automation until the tax mapping has been checked.
Case Study: Fixing GST/HST for a Shopify Nonprofit Store2
A Toronto nonprofit is using Shopify to sell fundraising products, but the tax setup isn’t working properly.
The Problem
The store sells about $30,000 in fundraising gear. Because the tax setup isn’t mapped correctly, the store overcharges $3,900 in HST. Customers start asking questions, and the team isn’t sure whether the issue is coming from Shopify, QuickBooks, or the tax settings.
What We Do
We review the GST/HST setup, tax-exempt items, no-tax product setup, QuickBooks tax mapping, and the overcharged amount.
The Result
The store corrects the $3,900 HST issue, reduces customer confusion, and has a cleaner setup for future fundraising sales.
This kind of issue can also come up with Shopify tax exemption setup, especially when certain products, customers, or sales should be treated differently.
Common Shopify QuickBooks Sync Problems and Fixes
Even with a good setup, sync issues can happen.The good news is that most problems come down to timing, mapping, gateways, refunds, fees, or tax settings. Here’s a simple troubleshooting table:
| Problem | Likely Cause | Fix | Best For |
| Payouts don’t match | Fees, refunds, timing | Check payout report | Bank matching |
| Fees look wrong | Bad mapping | Remap to expense | Profit clarity |
| Tax is off | Wrong tax setup | Review tax mapping | GST/HST or sales tax |
| Missing sales | Sync issue | Check logs and re-sync | Complete reporting |
| Gateways are mixed | One clearing account | Separate by processor | PayPal, Klarna, Shop Pay |
| Reports look messy | Too much order detail | Use payout summaries | Faster month-end |
Shopify Payouts Don’t Match Bank Deposits
This usually comes from timing differences, fees, refunds, or chargebacks.
Fix: Compare the Shopify payout report to the QuickBooks entry and bank deposit before adjusting anything manually.
Shopify Fees Go to the Wrong Account
Fees can get buried inside sales if mapping is wrong, especially because Shopify Payments fees can vary by card type and location (fees and costs).
Fix: Map Shopify and payment processor fees to dedicated expense accounts.
Sales Tax or GST/HST Syncs Incorrectly
Tax can land in income if the setup is wrong.This also affects Shopify sales tax reporting, because tax reports only help if the setup behind them is clean.
Fix: Map collected tax to a tax payable account, not sales.
Sales Are Missing From QuickBooks
This can happen because of sync errors, skipped dates, or disconnected apps.
Fix: Check the app sync logs and re-sync only the missing period.
Multiple Payment Gateways Get Mixed Together
PayPal, Klarna, Shop Pay, and Shopify Payments can become messy if they all land in one place. If your store also sells on Amazon or other platforms, global ecommerce accounting becomes more important because each platform has its own payout timing, fees, and reporting style.
Fix: Use separate clearing accounts for each gateway.
Ready for Shopify and QuickBooks to Finally Match?
Shopify QuickBooks integration isn’t just about moving data between two apps. It’s about knowing whether your numbers actually make sense. When the setup is right, QuickBooks can show your Shopify sales, fees, refunds, taxes, gift cards, payouts, and deposits in a way that’s much easier to trust.
The month-end gets simpler. Tax time gets less stressful. And you don’t have to keep guessing why Shopify and your bank account don’t match. At the end of the day, automation only helps if the setup is right.
If your Shopify numbers feel messy, or you’re not sure whether QuickBooks is showing the full picture, contact SAL Accounting and get a clearer sense of what needs to be fixed, tracked, or set up next.