Your Shopify sales may look good on the dashboard. But are your books just as clear at month-end? A solid month-end close process keeps your store profitable, tax-ready, and on top of cash flow. Here’s the surprising part: 82% of small businesses fail because of poor cash flow management. For e-commerce sellers, missed payouts, hidden fees, and inventory mistakes are often to blame.
Closing your books every 30 days solves this. It protects your margins, keeps you compliant, and helps you avoid year-end stress. This guide from SAL Accounting shows you the exact Shopify checklist, which makes it simple.
Quick Takeaways
- The month-end accounting checklist is a routine that keeps your books accurate and taxes clear.
- It helps you reconcile payouts, update inventory, and review reports each month.
- Using tools like A2X, QuickBooks, or Xero saves time and reduces errors.
- Checking GST/HST in Canada and sales tax in the U.S. monthly keeps you compliant.
- Doing it consistently every 30 days protects cash flow and builds trust in your numbers.
What Is the Month-End Accounting Checklist for Shopify Sellers?
The month-end accounting checklist is the routine you follow at the end of each month to keep your books clear and reliable. It covers the main parts of your finances (sales, payouts, fees, refunds, inventory, and taxes). This list makes sure nothing gets missed and every number is in the right place. Schedule a quick chat with our e-commerce accountant in Toronto and keep everything on track.
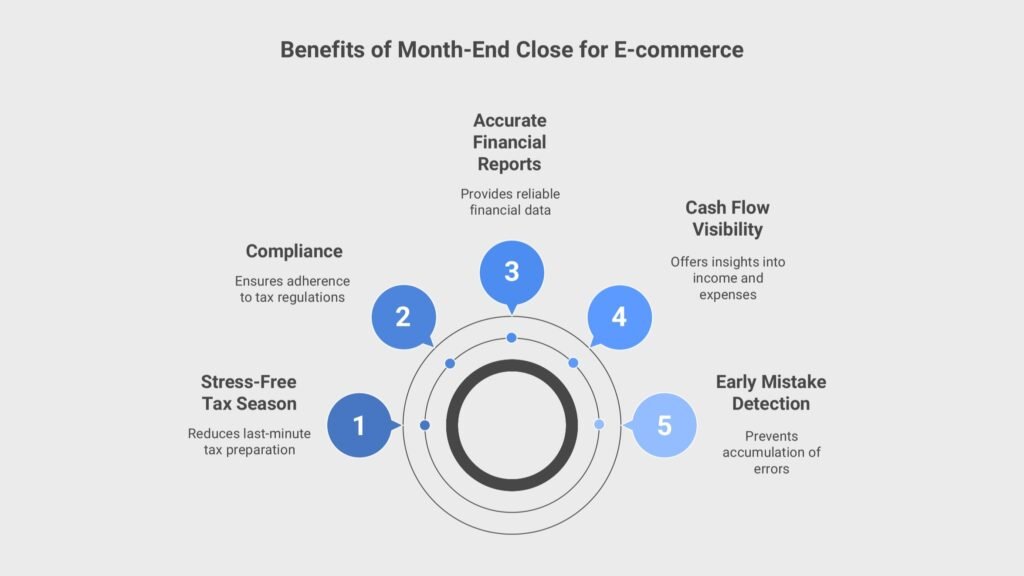
Why Does the Month-End Close Matter for Shopify and eCommerce Sellers?
Closing your books every month may feel like extra work, but it’s worth it. E-commerce accounting in 2025 for small businesses requires a clear plan. Here’s why:
- It stops mistakes early. Missing payouts, skipped refunds, or unrecorded fees won’t pile up.
- It shows your cash flow. You can see what came in, what went out, and what’s left.
- It keeps your numbers solid. Reports stay accurate, so you can share them with confidence.
- It keeps you compliant. Sales tax, GST/HST, and US state taxes stay on track, learn more about Shopify seller taxes for Canadian and US businesses.
- It makes tax season stress-free. You’ve already done the work month by month, so there’s no last-minute rush.
Which Reports Do You Need for the Month-End Close?
Reports make your e-commerce and Shopify month-end close process super easy. They track your sales, taxes, and costs. This keeps your books straight. Here’s what you need for your e-commerce bookkeeping checklist. Key reports include:
- Sales Report: Shows your Shopify and Amazon sales. Go to Shopify Admin > Analytics > Reports (here). Have a look at the Amazon Tax Guide for Canada and the US for more.
- Payout Report: Checks Shopify Payments against bank deposits. Look in Payments > Transactions.
- Inventory Report: Tracks stock and COGS (what your products cost). Check Shopify’s Inventory section.
- Expense Report: Lists fees, shipping, and ads. Use QuickBooks or a spreadsheet.
- Tax Report: Confirms GST/HST (Canada) or sales tax (US). Pull from Shopify’s tax reports. Check the guide on sales tax vs. use tax for Shopify and e-commerce sellers.
Example: A US shop caught tax errors and saved $1,000. Apps like A2X or Xero run these fast. These reports make your Shopify accounting month-end smooth. They’re key month-end tasks for online sellers.
This table lists key reports for a streamlined Shopify and e-commerce month-end close process.
| Report Name | Purpose | Where to Find It | Key Details |
| Sales Report | Tracks Shopify/Amazon sales. | Shopify Admin > Analytics > Reports | Sales, discounts, returns. |
| Payout Report | Reconciles payments with deposits. | Shopify Admin > Payments > Transactions | Payment dates, amounts, fees. |
| Inventory Report | Monitors stock and COGS. | Shopify Admin > Inventory | Stock, restocks, costs. |
| Expense Report | QuickBooks or a spreadsheet | Payment dates, amounts, and fees. | Fees, shipping, ad spend. |
| Tax Report | Ensures tax compliance. | Shopify Admin > Taxes > Tax Reports | Taxes, exemptions, remittances. |
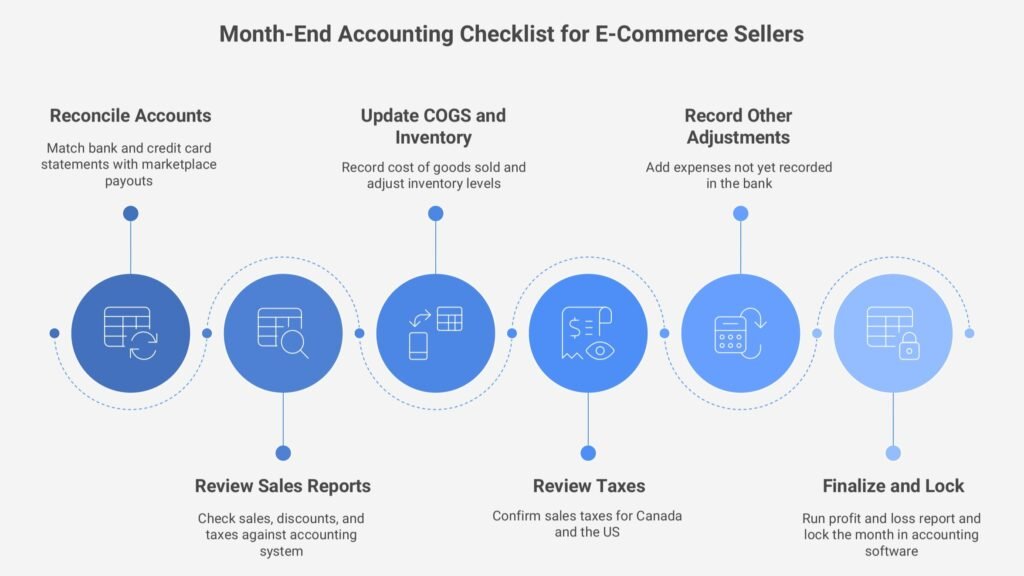
Step-by-Step Month-End Accounting Checklist for Shopify and E-Commerce Sellers
With the right checklist, Shopify and e-commerce sellers can keep their books accurate, stay tax-ready, and avoid surprises. Follow these six steps each month to keep everything on track:
1. Reconcile your accounts
Review your bank and credit card statements. Match deposits and expenses with payouts from Shopify, PayPal (PayPal Express Setup), Stripe, Amazon, or other marketplaces. Include all fees, refunds, and chargebacks. You should know what Shopify tax exemptions are and how to set them up. This step keeps your cash records accurate.
Pro Tip: Reconcile at the payout level instead of order by order. It’s faster and matches how the money actually lands in your bank.
2. Review sales reports
Check your Shopify Finance Summary or marketplace sales reports (Amazon, Etsy, eBay, WooCommerce, etc.). Look at sales, discounts, shipping, and taxes. Compare these totals to your accounting system. Fix mismatches before moving on. WooCommerce Canada tax setup may help.
Pro Tip: If numbers don’t line up, check for pending payouts, currency conversions, or late refunds. These are the most common reasons.
3. Update COGS and inventory
Record the cost of the products you sold during the month. Update your inventory with a stock count or data from your system. Adjust for returns, damaged products, or lost stock. This step shows your true profit. Gain enough information about e-commerce taxes in Canada or any other country you are in.
Pro Tip: Add landed costs like shipping, packaging, or duties. Spread them across your products so your profit margins stay accurate.
4. Review taxes
Check your sales taxes every month.
- In Canada, confirm GST/HST and provincial taxes such as PST and QST.
- In the US, check each state. Shopify and some marketplaces collect in certain states, but not all. Confirm what you still need to remit. How to file sales tax in the US as an e-commerce business.
Pro Tip: Keep Canadian GST/HST separate from US state sales tax in your books. Mixing them makes filing messy.
5. Record other adjustments
Add expenses that don’t show in the bank yet. This includes payroll, prepaids, or unpaid bills. Recording these gives you the full picture of your business.
6. Finalize and lock
Run your profit and loss report. Review margins, refunds, and fees. Keep an ultimate bookkeeping checklist for small businesses in reach. Fix anything that looks off before closing. Once you’re confident, lock the month in your accounting software. This keeps your books consistent going forward.
- Read More: “Automating Your Shopify Accounting“
Manual vs Automated Month-End Close Process for Shopify Sellers
You can close your books in two ways: by hand or with software. Both work, but one will save you a lot more time.
Manual Close
Manual close means doing everything yourself. You download Shopify reports and bank statements. Then you match deposits, record fees, and post refunds one by one.
This works if your store is small with only a few orders. But it takes a lot of time and makes it easy to miss details.
Automated Close
Automated close uses apps to send your Shopify numbers straight into your accounting system. Choose the best Shopify accounting software and integration to get the desired results. The software posts payouts, fees, and taxes for you. This keeps your books tidy and saves hours each month. Popular tools include:
- A2X syncs Shopify payouts with QuickBooks or Xero.
- QuickBooks Online connects with Shopify to record sales.
- Xero: works with add-ons for e-commerce bookkeeping.
- QuickBooks Connector (OneSaas) pulls Shopify sales into QBO.
Automation is best if you have more than 100 orders a month, sell in different currencies, or use more than one payment gateway. Once set up, your close takes minutes, not hours. Reach out to us and take the stress out of your monthly books with our Shopify Accounting Services in Toronto.
How Can You Simplify the Shopify Month-End Close?
The month-end close by hand takes a lot of time. The right software does most of the work for you. These tools connect Shopify to your accounting system. They bring in sales data and post entries that match your bank deposits. This means less work for you and fewer errors in your books.
1. Sync Shopify Payouts Automatically
Apps like A2X take each payout and break it into sales, fees, shipping, and taxes. They post it as a journal entry that lines up with your bank deposit. This makes reconciliation fast and accurate. Check out the best e-commerce accounting software in 2025 to stay compliant.
Pro Tip: Always reconcile at the payout level. Matching orders one by one wastes time and creates mistakes.
2. Record Daily Sales Automatically
QuickBooks Online connects to Shopify and posts daily sales into your books. You only need to match them to your bank feed. It maps your data into the right accounts, such as:
- Sales income
- Discounts
- Taxes collected
- Shipping income
Pro Tip: Set up your account mapping carefully when you start. Once it’s right, you won’t need to fix journals later.
3. Review Reports with Confidence
Xero and other accounting software give you reconciliation reports at month-end. These reports help you check totals, spot errors, and close the month with confidence.
Pro Tip: Run a trial balance after reconciliation. If something looks off, check for refunds or fees that moved into the next month.
4. Use Integrations to Save Time
For stores with many orders, integrations like QuickBooks Connector (OneSaas) post orders, fees, and taxes straight into your books. Shopify integration with Xero may also help. This saves hours each month and keeps your accounts organized.
Pro Tip: Test integrations with a short date range first. This helps you catch mapping mistakes before you import a full month of sales.
This table summarizes steps to simplify the Shopify month-end close with automation:
| Step | Tool | Action | Benefit |
| Sync Payouts | A2X | Auto-posts payout entries. | Fast reconciliation. |
| Record Daily Sales | QuickBooks Online | Posts daily sales to accounts. | Fewer entry errors. |
| Review Reports | Xero or similar | Check reports, trial balance. | Accurate close. |
| Use Integrations | QuickBooks Connector, Xero | Auto-posts orders, fees, taxes. | Saves time, organizes books. |
Compliance Corner: Taxes for Shopify Sellers in Canada and the US.
Monthly tax reviews keep you compliant and prevent year-end surprises. In this section, you will see what matters most for Shopify sellers in Canada and the US, and the rules to check during your close.
Canada:
- Register for GST/HST once sales pass $30,000 in four quarters. GST/HST Return in Canada is sometimes tricky.
- Track provincial taxes such as PST in British Columbia and QST in Quebec.
- Apply the correct rates when you sell across provinces.
- Match the tax collected to the amounts recorded in your books.
United States:
- Sales tax rules differ by state. Each state sets its own thresholds.
- Register in states where you pass sales or transaction limits.
- Shopify acts as a marketplace facilitator in some states but not all.
- Watch 1099-K reporting thresholds, limits continue to change, and processors report your payouts once you pass them. See how to file Form 1099-K for e-commerce.
Case Study: Fixing Sales Tax for the US Shopify Seller1
Problem:
A Shopify store in the US sold skincare products and grew fast. The owner passed sales thresholds in two states but didn’t register for sales tax. Customers noticed the wrong tax on invoices. The owner worried about back taxes and fines.
What We Do:
We checked monthly sales by state. We found the states where the thresholds were passed. We registered the store in those states. We updated Shopify tax settings and set up reports that showed sales tax by state. We also separated marketplace-collected tax from the tax the store had to file.
The Result:
The store avoided fines and stayed compliant. Monthly reports showed exactly how much tax Shopify collected and how much the owner still had to file. With clear reports, the owner trusted the numbers and focused on growth.
Download Your Complete e-Commerce Month-End Close Checklist
A step-by-step list makes your books easier to manage at month-end. This checklist shows you exactly what to do—reconcile payouts, record COGS, review taxes, and lock the month. Use it every 30 days to keep your books clean and your cash flow clear. You can grab the full checklist from the link below and start using it right away:
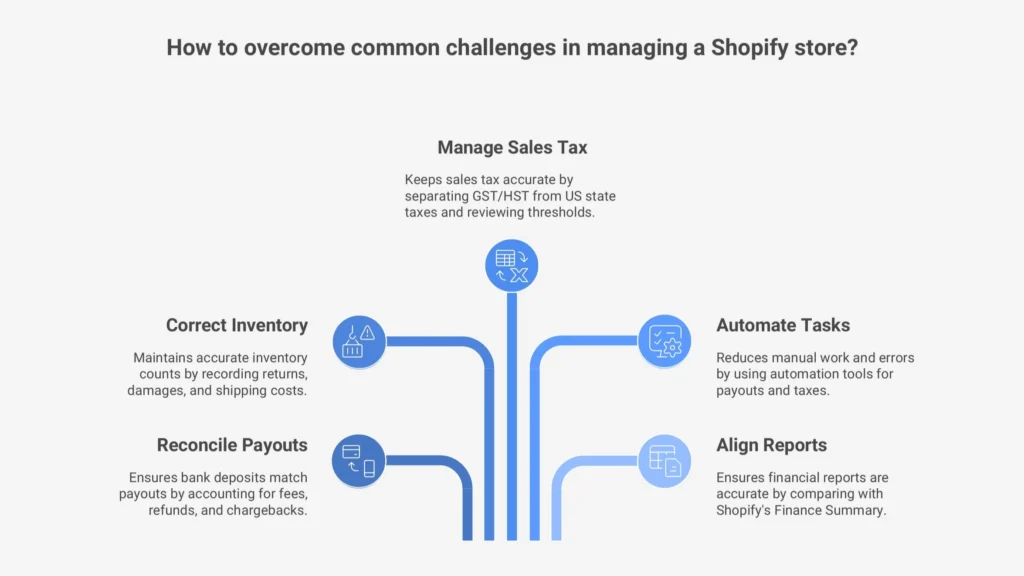
Common Challenges and How to Overcome Them
Even with a checklist, Shopify sellers often hit the same roadblocks. Here are the most common ones and how you can deal with them:
1. Payouts Don’t Match Bank Deposits
Payouts don’t always equal the deposit in your bank. This happens when a payout crosses into the next month or when fees, refunds, or chargebacks reduce the total.
Fix it: Reconcile at the payout level. Check for pending payouts. Look at refunds or chargebacks that cut into the deposit. Be careful about the e-commerce accounting errors that cost you thousands.
2. Inventory Numbers Look Off
Inventory often feels wrong because returns, damages, or shipping costs don’t get recorded.
Fix it: Do a quick stock count at the end of the month. Record returns and damages right away. Add shipping and duties to your product costs so your profit stays accurate.
3. Sales Tax Gets Confusing
Canada and the US follow different rules. It’s easy to miss what you need to collect.
Fix it: Keep GST/HST separate from US state taxes in your books. Review Shopify’s marketplace facilitator list each month. Check if you crossed new thresholds in any province or state.
4. Too Much Manual Work
Manually matching payouts and typing in numbers takes forever. It also makes errors more likely.
Fix it: Use automation tools like A2X, QuickBooks, or Xero add-ons. Once you set them up, they handle payouts, fees, and taxes for you.
5. Reports Don’t Line Up
Sometimes your profit, margins, or tax totals don’t make sense.
Fix it: Run a trial balance and compare it to Shopify’s Finance Summary. Check for timing issues, refunds, or accounts that map the wrong way.
Case Study: Fixing a Shopify Seller’s Month-End Roadblocks2
Problem:
A Shopify store in Vancouver sells lifestyle products in Canada and the US. Each month, payouts don’t match deposits. Inventory doesn’t add up. Sales tax rules cause confusion. The owner spends eight hours in spreadsheets, but the reports still look wrong.
What We Do:
We reconcile at the payout level. We add a quick stock count at month-end. We include shipping and duties in product costs. We separate GST/HST from US state taxes. We connect A2X to QuickBooks so sales, fees, and taxes flow in automatically.
The Result:
Reconciliation time drops from eight hours to under two. Inventory and reports match. Taxes are clear. The owner trusts the numbers and can plan for growth with confidence.
Book a free call today and get expert help with our bookkeeping for e-commerce at SAL Accounting.
Final Thoughts
The month-end close helps Shopify and e-commerce sellers keep books clean, taxes accurate, and cash flow clear. Using a checklist each month cuts mistakes, saves time, and shows you the real numbers. You can do it by hand or with apps. What matters most is staying consistent.
If you need help with accounting or taxes, contact us at SAL Accounting. We help e-commerce sellers in Canada and the US close their books with ease and focus on growth. Book a free call today and get your month-end close done right.
FAQs: Your Shopify Month-End Close Questions Answered
It’s wrapping up your Shopify finances monthly. You reconcile sales, expenses, and taxes. This keeps your books clean and compliant.
Match Shopify sales to bank deposits. Go to Shopify Admin > Analytics > Reports. Compare with your bank statements.
Run sales, payout, inventory, expense, and tax reports. Find them in Shopify Analytics or apps like QuickBooks.
Yes! Apps like A2X and Xero automate reconciliations and reports. They save hours each month.
A2X, QuickBooks, Xero, and Wave are great. They sync with Shopify for easy reporting. Pick one for your store’s needs.
Update stock in Shopify’s Inventory section. Calculate COGS (product costs) using reports. Apps like Wave help automate this.
Manual closures take 4-8 hours. Automated tools cut it to 1-2 hours. It depends on your store’s size.
Monthly closes track ongoing finances. Year-end closes prep for taxes and audits. Both keep your Shopify accounting month-end solid.