Our goal is to help Shopify store owners build strong Shopify refund policies, smooth return processes, smart refund plans, and lower refund fees to keep customers happy and protect profits. A surprising fact most Canadians miss is that in 2025, online returns averaged 19.3%, fueling $850 billion in U.S. retail returns and quietly cutting margins 20 to 45% through restocking and shipping losses.
SAL Accounting will show you exactly how to turn refunds from a profit drain into a powerful loyalty builder and tell you simple steps to lower return rates so happy customers keep coming back for more.
Quick Takeaways
- Shopify does not require a refund policy, but a clear one builds trust and cuts chargebacks.
- Set up your policy in Settings > Policies: enable returns, set window, choose shipping payer, add fees.
- You lose the original processing fee (2.4–2.9% + 30¢) on every refund — use restocking fees or store credit to fight back.
- Refunds take 3–10 business days on cards (5–7 in Canada); Shopify processes instantly, banks add delay.
- Lower returns under 15% with better photos, size charts, accurate descriptions, quality checks, and stricter rules.
Does Shopify Require a Refund Policy?
A clear refund policy is one of the most important things you can have as a Canadian Shopify store owner. It builds instant trust, stops many chargebacks before they start, keeps customers happy, and protects you from legal complaints. Without it, you risk angry reviews, lost sales, and extra headaches from confused buyers.
Shopify does not force you to have a refund policy (rules). You can technically run your store without one. But almost every successful Canadian merchant creates one anyway. Let’s see why this matters so much for Canadian Shopify stores:
- It builds trust fast. Clear rules reduce angry emails and bad reviews.
- It cuts chargebacks. When customers know the policy upfront, they’re less likely to dispute charges.
- It keeps you compliant. Canada has no federal law forcing refunds for “change of mind” on non-defective items. But provinces like Ontario and Quebec require clear disclosure of your policy. Check the HST/GST for your Shopify store.
Example: A Toronto clothing store sets a 30-day return window with customer-paid shipping. They post the full policy in the footer, checkout, and emails. Customers feel safe buying, returns stay manageable, and disputes drop.
Pro Tip: Check your policy every year. Update it for new products, seasons, or provincial changes (e.g., Quebec’s stricter language rules for French policies). A Shopify accountant and bookkeeper can handle everything for you.
Here’s a quick comparison of having a policy vs. skipping it for Canadian stores:
| Aspect | With a Clear Refund Policy | Without a Refund Policy |
| Customer Trust | High — buyers feel safe and confident | Low — confusion leads to abandoned carts |
| Chargebacks | Fewer — policy visible reduces disputes | Higher — more “I didn’t know” complaints |
| Compliance Risk | Low — meets ON/QC disclosure rules | Higher — complaints to consumer offices possible |
| Returns Management | Easier — rules set expectations upfront | Harder — more manual emails and arguments |
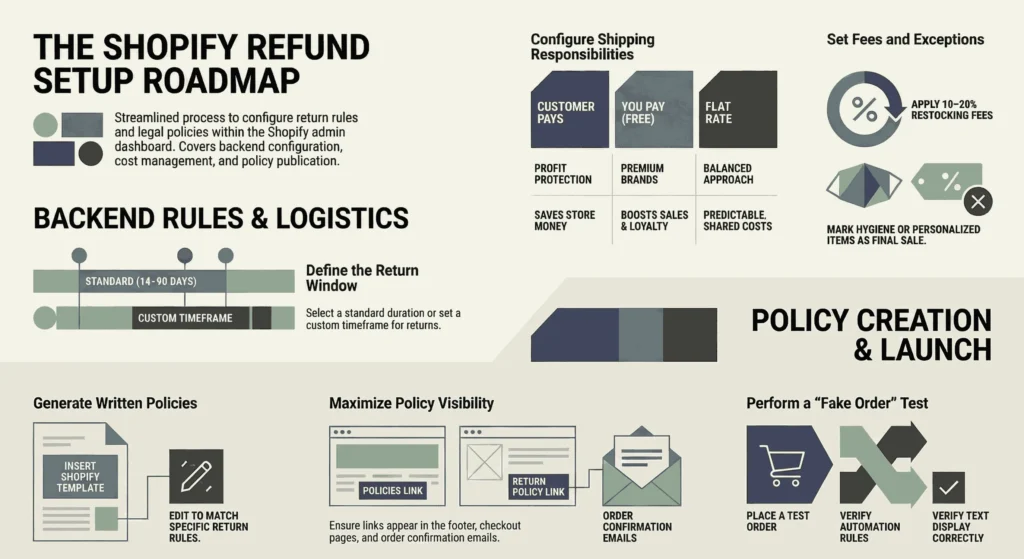
How to Set up a Refund Policy on Shopify? (Step-by-Step Guide)
Now, let’s set up your Shopify refund policy the easy way. Follow these steps right in your Shopify admin. Each one comes with simple details so you can follow along without confusion.
1. Access Settings and Policies
Log in to your Shopify admin dashboard. Click Settings at the bottom left. Then pick Policies. This page handles your written refund policy plus the automatic return rules. Choose the best Shopify plan if you are a beginner.
2. Turn On and Configure Return Rules
Go to the Return rules section (it may say Manage or Turn on returns). Switch on returns so customers can request them. Set your return window. Pick 14, 30, 60, 90 days, or type in a custom number of days from the delivery date.
3. Decide Who Pays Return Shipping
In the return rules, choose the return shipping cost option.
- Customer pays (this protects your profits. Most stores pick it.)
- You pay (helps build loyalty, but costs you more)
- Flat rate (charge a set amount like $8 or $10)
Pick what works best for your store. Here is a quick overview of return shipping options in Shopify:
| Option | Who Pays Return Shipping | Best For | Main Pro | Main Con |
| Customer pays | Customer | Most stores, profit protection | Saves you money | May deter some buyers |
| You pay | You (free returns) | Premium brands, high loyalty focus | Boosts satisfaction & sales | Higher costs per return |
| Flat rate | Customer (fixed fee) | Balanced approach | Predictable fee, covers part cost | Customers may complain about fee |
4. Add a Restocking Fee If Needed
Check the box to charge a restocking fee if you want one. Type in a percentage. usually 10–20%. This covers costs like cleaning or repackaging opened items. Feel free to skip it if you want a simple, no-fee experience for customers. Shopify automation tools and integrations may help you here.
5. Set Final Sale Items or Exceptions
Mark products or collections as final sale so they can’t be returned. Think personalized items, clearance sales, underwear, or hygiene products. Add them by collection or a single product. Shopify blocks returns on these automatically.
6. Write or Edit Your Written Return and Refund Policy
Scroll down to Written policies. Click Return and refund policy. Shopify gives you a basic template. Click the Insert template to fill it in. Edit the words so they match your return rules perfectly (like the window, shipping, fees, and exceptions).
7. Make the Policy Clear and Friendly
Use simple, positive words. Start with something welcoming like: “We want you to love your purchase. Returns are easy within 30 days.” Add these key details:
- Your exact return window
- What condition items need (unused, tags still on, original packaging)
- Who pays return shipping?
- Any restocking fees
- How refunds happen (back to the original payment or store credit)
- Exceptions (final sale items). Check the Shopify tax exemption guide.
- Your contact email for questions
Throw in a quick Canadian note if it fits: “We follow provincial consumer protection laws.”
8. Save and Make It Visible Everywhere
Click Save up top. Shopify puts the policy link in your footer for most themes. Check it shows on:
- The checkout page
- Order confirmation emails
- Product pages (add it manually if missing)
Pro Tip: Test it yourself. Make a fake order, then try requesting a return. Make sure the rules kick in, and the policy text looks right. This quick check avoids customer mix-ups later.
- Read More: “What Are the Best Shopify Dropshipping Apps in 2026”
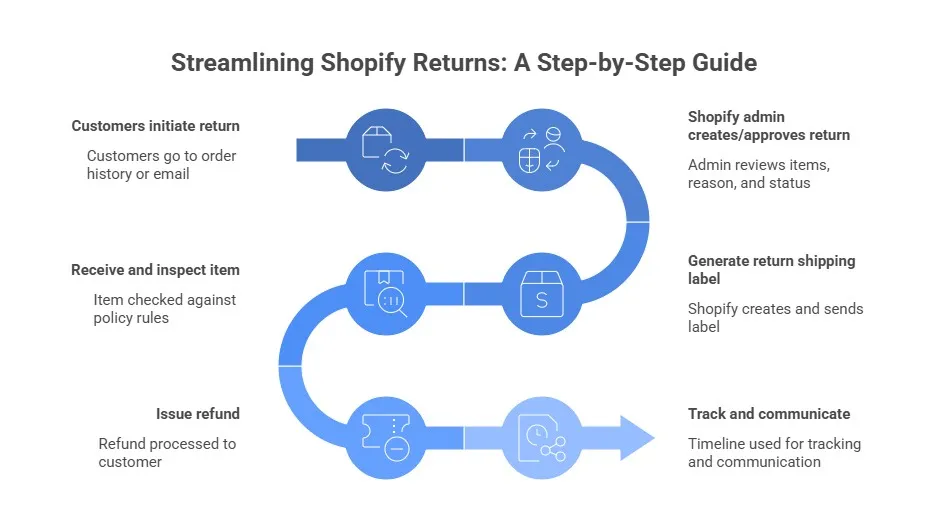
How Do Returns Work on Shopify?
Once your policy and rules are set, customers can start returning. Shopify gives you two main ways: self-serve (the customer does most of it) or manual (you handle it). Either way, you stay in control.
How Customers Start a Return
Customers go to their order history on your store (or click the link in their order confirmation email). If you turn on self-serve returns, they see a button like “Request a return.” They pick the items, explain why (e.g., “didn’t fit” or “defective”), and follow your rules. If self-serve is off, they email you or use a contact form. Then you create the return manually.
Create or Approve the Return in Shopify Admin
Go to Orders in your admin. Find the order and click it. Scroll to the Returns section (or click Create return). You see:
- Which items do they want back?
- The reason they picked
- Return window status (approved or expired)
Approve it if it fits your rules. Decline if it doesn’t (e.g., past 30 days or final sale item). Add a note if you want; customers see this. Check the best Shopify integrations for e-commerce for a smooth process.
Generate a Return Shipping Label (Optional but Smart)
Offering a prepaid return label makes the whole process way easier for everyone. Shopify works with carriers like Canada Post, UPS, and others to create labels right in the admin. If you decide to offer labels:
- Choose Generate shipping label when approving the return.
- Pick who pays. This should match what your Shopify refund policy says (you cover it, customer pays, or a flat fee).
- Send the label straight to the customer by email. They just print it, stick it on, and drop the package off.
This cuts down on endless emails asking, “How do I return this?” Customers really appreciate the convenience, and you get full tracking, so nothing gets lost. See how to ship products between Canada and the U.S.
Receive the Item and Inspect It
Once the returned package shows up at your door (or warehouse), you need to check it quickly. When the item arrives:
- Check the item against your policy rules. Look at the condition, whether tags are still attached, and if it’s in original packaging.
- In the order page, go to the Returns section and mark it as Received.
- Decide what to do next: give a full refund, partial refund, store credit, or process an exchange instead.
A fast inspection keeps things moving and helps you spot any patterns (like frequent damage claims).
Issue the Refund
This is the step where the customer gets their money back. Do it carefully to avoid mistakes. Still inside the same order:
- Click Refund (or Issue refund if you’re in the Returns area).
- Choose the amount: full original price, partial (if damaged or missing parts), or adjust down for restocking fees or return shipping you covered.
- Pick the refund method: back to the original payment card, store credit, or a manual option like a gift card.
- Add a short, friendly note like “Thanks for the return. We’ve processed your refund!
Track Everything and Communicate
Use the Timeline in order to see every step. Send custom emails if needed (e.g., “We got your return and processed the refund”). If issues pop up (lost package, damaged item), reply fast; it keeps customers happy.
Pro Tip: Turn on self-serve returns if you can. It cuts your work in half and makes customers feel in control. Just double-check it matches your refund policy exactly.
How to Handle Refunds and Chargebacks on Shopify?
Refunds make customers happy, but they cost you a bit behind the scenes. Let’s look at the real fees so you can understand them and keep more money. Shopify doesn’t charge anything extra when you process a refund. The main hit comes from the payment processing fee you already paid on the original sale.
With Shopify Payments, that fee (usually 2.4–2.9% + 30¢) stays gone forever. even if you refund right away. Currency conversion fees for sales in another currency also don’t come back.
Example: A $100 sale costs you about $3.20 in fees upfront. You refund the full $100. The customer gets $100 back, but you still lose the $3.20. When returns happen often (around 19–20% in recent online sales data), those small amounts add up fast. Stores in Canada notice it more when payments cross currencies.
Practical ways to fight back
Here are simple steps to lower those costs and protect your profits. You can also track COGS for your Shopify store.
- Add a 10–20% restocking fee in your return rules to cover processing and handling.
- Charge return shipping (or a flat rate) when your policy allows it.
- Offer store credit or exchanges first. This keeps the money in your store.
- Waive fees only for good reasons: defective items, loyal customers, or one-time fixes.
- Add a small buffer to product prices if returns are common in your niche.
When it’s smart to eat the fee
Sometimes taking the hit makes sense for the long term. Here’s when it pays off.
- Defective or wrong item. Refund everything, including shipping, to protect your brand.
- Valuable repeat customer. Skip restocking to keep them coming back.
Pro Tip: Check Shopify Analytics > Reports > Returns every few months. If refund losses go over 5–8% of revenue, adjust your rules: shorter window, more final-sale items, or higher restocking.
| Strategy | How It Helps | Best For | Savings Impact |
| 10–20% restocking fee | Covers processing + handling | Most stores, high-value items | Recovers 10–20% of lost fees |
| Charge return shipping / flat rate | Customer pays return cost | Profit-focused stores | Cuts shipping losses heavily |
| Store credit / exchanges first | Keeps money in your store | All stores, repeat buyers | Avoids original fee loss |
| Waive fees selectively | Builds loyalty without free-for-all | Defective items, VIP customers | Controls cost, keeps satisfaction |
| Price buffer for returns | Builds in expected refund costs | High-return niches (fashion) | Offsets average losses long-term |
How Long Does a Shopify Refund Take?
Refunds move fast on your side, but customers often wait longer. Here’s the clear timeline once you process a refund in Shopify.
You issue the refund
Hitting “refund” in the order is instant. Shopify sends the request immediately for gateways like Shopify Payments, PayPal, Stripe, and most others.
Pending stage in your admin
You’ll see “Pending” in the order timeline for 1–2 business days. Shopify is coordinating with the payment provider during this step.
When the customer gets the money
- Credit/debit cards: 3–10 business days (usually 5–7 days in Canada).
- PayPal: Often 1–3 days, sometimes instant.
- Store credit or direct bank transfers: Immediate or within a few hours.
Common delays
Canadian banks can add 3–5 extra days due to their processing rules. International cards take longer. Weekends, holidays, and time zone differences push things back further.
How Do Shopify Refunds Affect Accounting and Taxes in Canada?
Refunds touch your payouts, books, and taxes. Here are the simple Canadian compliance basics to stay on the right side of the CRA. These are the key rules you need to follow:
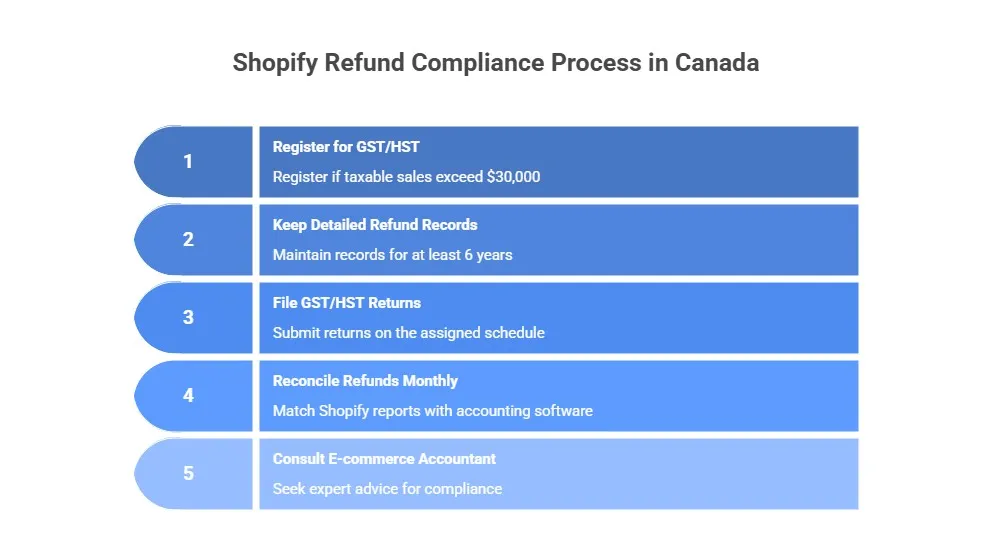
- Register for GST/HST if your taxable sales exceed $30,000 per year (or register voluntarily earlier to claim input tax credits on expenses). See what happens if your e-commerce store is not registered with GST/HST.
- Keep detailed refund records, including orders, refund amounts, and tax adjustments for at least 6 years, as the CRA may request them during audits.
- File your GST/HST returns on your assigned schedule (monthly, quarterly, or annually). Refunds automatically reduce your net tax payable, so you remit less to the CRA.
Shopify handles most of the tax math for you, but these rules keep everything compliant and audit-ready.
Pro Tips: Reconcile refunds monthly: Export your Shopify tax report and payout summary, then match them against your accounting software in one quick session. You can get expert help and consult our e-commerce accountant and bookkeeper to avoid issues.
How Can You Communicate Refund Policies Effectively to Customers?
Clear and friendly communication turns a return into a good experience. When customers feel heard and respected, they usually come back to shop again.
Make your policy easy to find and read
Put the refund policy in obvious places: footer, checkout page, order confirmation emails, product pages, and customer account area. Use simple words. Start with a friendly line like “We want you to love your purchase. Returns are easy and stress-free.”
Use ready email templates
Prepare short, kind messages for common situations. This keeps replies quick and consistent.
- When you get a request: “Thanks for reaching out! We received your return request for order #[number] and will check it soon.”
- When approved: “Your return is approved! Here’s your prepaid label [link]. Print it, drop it off, and we’ll process your refund once we get it.”
- Refund issued: “We processed your refund of $[amount]. It should show up in your account within 5–10 business days. Thank you!”
- If denied: “We’re sorry, but this return doesn’t qualify (for example, past the 30-day window). Reply if you have questions. We’re here to help.”
Always include the customer’s name and order number. End with an offer to help. Use e-commerce accounting tools for this.
Handle complaints or disputes calmly
Reply fast, ideally within hours. Start by saying, “I’m sorry this didn’t work out for you.” Explain the situation clearly. Offer a fair fix when it makes sense, like partial store credit. Keep all messages as records in case of a chargeback.
Pro Tip: Send a short follow-up email a few days after delivery: “We hope you’re enjoying your order! If anything isn’t right, returns are easy.
Case Study: Toronto Skincare Boutique Reduces Chargebacks by 70%1
A skincare boutique in Toronto’s Queen West neighbourhood (near Ossington Ave) faced 15–20 monthly chargeback complaints from unclear return instructions and poor follow-up.
Problem
Confused customers disputed charges, support emails piled up, and negative reviews hurt trust. Chargebacks cost time and money.
What We Did
We helped them add visible policy links on every page, send proactive post-purchase emails, and use friendly templates for return approvals and denials.
The Result
Chargebacks dropped 70% in 3 months, repeat purchases rose 25%, and customers left reviews praising “easy returns and great support.” The owner now spends less time on disputes and more on growing the business.
How to Analyze and Reduce Your Shopify Return Rate?
Returns happen, but too many hurt your profits and take extra time. Tracking them helps you find patterns and fix problems, so fewer customers send items back.
Go to Analytics > Reports in your Shopify admin. Check the Returns report. Look for:
- Your overall return rate (percentage of orders with returns). aim for under 15%, ideally 10–15% for a healthy store.
- Top return reasons (fit issues, defective, wrong item, etc.).
- Problem products or collections.
- Trends over time (monthly spikes or seasonal patterns).
Here are simple ways to lower your return rate:
- Add better photos, videos, and size charts to product pages. show items from different angles and on real models.
- Write accurate descriptions. clearly mention fit, material, and sizing so customers know what to expect.
- Do quality checks before shipping. catch defects early.
- Offer loyalty perks. Give small discounts or free shipping to customers who rarely return.
- Test stricter rules for high-return items. shorten the window or add restocking fees on certain categories.
Pro Tip: Review the returns report every month. Pick the top 2–3 reasons or products causing the most returns. Fix one thing at a time (like adding a better size guide for clothing). Contact our bookkeeping expert to help you with this.
Case Study: Mississauga Fashion Boutique Cuts Return Rate from 28% to 12%2
A women’s fashion boutique near Square One in Mississauga struggled with a 28% return rate, mostly from fit issues and wrong expectations.
Problem
High returns meant heavy shipping and restocking costs, lost time on inspections, and frustrated customers who left bad reviews.
What We Did
We guided them to review the Returns report monthly, add detailed size charts, model photos with measurements, and a fit guide PDF. They also added a 15% restocking fee for opened items.
The Result
Returns fell to 12% in 6 months, saving $4,200 quarterly on shipping and restocking. Sales grew 18% as shoppers felt more confident buying online. “The numbers speak for themselves,” the owner says.
Final Thought
A good Shopify refund policy builds trust, saves you money, and helps your Canadian store grow. Keep rules clear, talk nicely with customers, handle returns fast, and check fees and returns regularly. This turns refunds into more repeat customers and better profits. Start today: review your policy, test a return, and see the difference. You’ve got this!
Ready to protect your profits and keep customers happy? Contact us today at tax@salaccounting.ca. Our team will help you set up everything right for your Canadian Shopify store.